💡 Info: This article originally appeared under the Finxter brand — in collaboration with NotSatoshi. Enjoy!
In the previous posts, we developed simple smart contracts, deployed them using Remix or Truffle, and interacted with them using JSON-RPC interface providers such as using web3.py or web3.js. In this post, we shall take a closer examination into how a smart contract works on the Ethereum blockchain at the grass root. More precisely, we look into how a smart contract works under the hood that includes bytecodes, EVM (Ethereum virtual machine), and ABI (Application Binary Interface). Further, it encompasses details of how the function call to the smart contract from the outside world gets transformed to the format understood by the Ethereum blockchain.
As a developer of smart contracts or Dapps, you might be curious to know how and what magic happens internally on Ethereum. Let’s begin our journey. Get Set go!
Table of Contents
EVM and Bytecodes
Ethereum Virtual Machine(EVM) is a virtual machine where transactions get executed. It can be visualized as a VMware or Virtualbox with Ethereum operating system or as a Java Virtual Machine (JVM) where you can load the bytecodes after compiling java code. Similarly, in the world of Ethereum, the smart contract or Dapps are written using a high-level language such as Solidity or Vyper, and it gets compiled into bytecodes. The bytecodes are then uploaded on the blockchain, get executed on the EVM. The EVM is the runtime execution of the smart contracts in Ethereum. There are many Ethereum client implementations such as Geth, Aleth, Parity, etc., and each client follows the EVM specification defined in the Ethereum Yellow Paper.
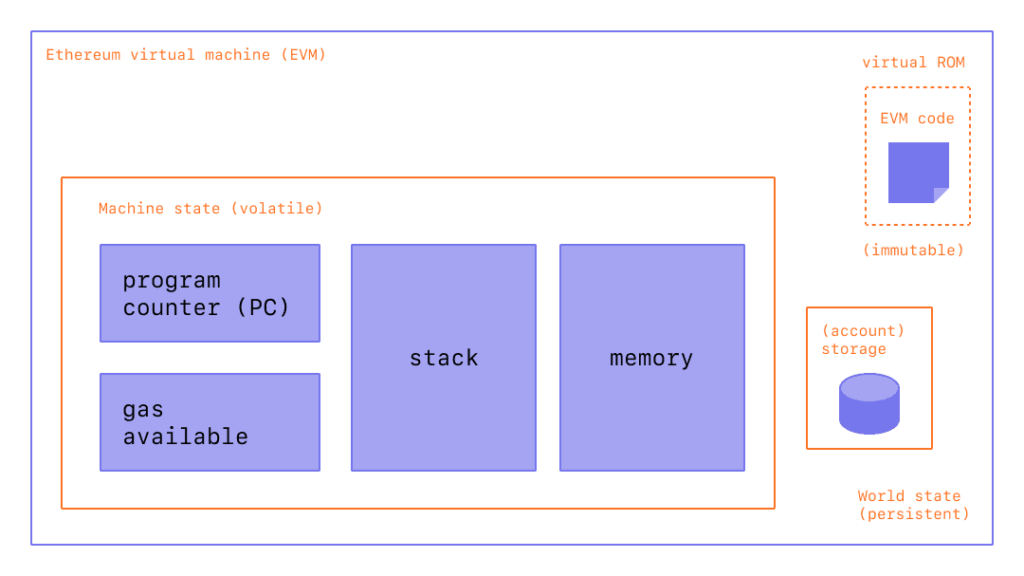
An EVM consists of
- Stack – with a depth of 1024 items to push and pop values. Each item can be 256 bits long to facilitate Keccak-256 hash computations.
- Key/Value or account store – a permanent or persistent storage for the smart contract. This is word addressible.
- Memory – This is volatile and word addressable.
- Also, it contains a Program Counter (PC) and tracking of available gas.
You can visualize the EVM as below (picture credit: ethereum.org).
In this section, we will use a solidity compiler such as solc and see how it generates the byte codes for EVM. For the same install the solc compiler with the below command.
$ npm i -g solcLet’s write a simple smart contract where we declare a number and define a public function. This simple contract is used to only demonstrate how bytecodes get generated.
// SPDX-License-Identifier: GPL-3.0
pragma solidity ^0.8.9;

contract Hello
{
   uint num = 4;

   function hello() pure public returns(string memory)
   {
      return "Hello";
   }
}
Save the file as hello.sol and compile it as below.
$ solcjs hello.sol --binThis would generate a file called hello_sol_Hello.bin. You can read the contents of this file which has all the bytecodes of the contract.
6080604052600460005534801561001557600080fd5b5061017c806100256000396000f3fe608060405234801561001057600080fd5b506004361061002b5760003560e01c806319ff1d2114610030575b600080fd5b61003861004e565b6040516100459190610124565b60405180910390f35b60606040518060400160405280600581526020017f48656c6c6f000000000000000000000000000000000000000000000000000000815250905090565b600081519050919050565b600082825260208201905092915050565b60005b838110156100c55780820151818401526020810190506100aa565b838111156100d4576000848401525b50505050565b6000601f19601f8301169050919050565b60006100f68261008b565b6101008185610096565b93506101108185602086016100a7565b610119816100da565b840191505092915050565b6000602082019050818103600083015261013e81846100eb565b90509291505056fea2646970667358221220b047160cb5bdea66bb3d2b9745738c401f71f1b6b16f554283de38018cb8e37d64736f6c634300080a00
Disassembly
To explain the important parts of the bytecodes, different colors are used. The one with blue – 6080604052 is the initialization of the smart contract and it is the same for all contracts. As, reading the bytecodes or the hex bytes generated by the compiler is difficult, to make it more human-readable the byte codes are associated with an Assembly language. Corresponding to the above bytecodes generated in Hex, mentioned below are a few assembly instructions (also called opcodes in EVM).
- PUSH1 = 60, push 1 byte to the stack
- SSTORE = 55, store it permanently on the EVM storage i.e. the blockchain
- PUSH32 = 7f, push 32 bytes on the stack
- MSTORE = 52, store it on temp memory or RAM of EVM
- There are many other Opcodes such as MLOAD, SLOAD, JUMP; STOP, RETURN, etc.
Thus, wrt the above bytecodes, we have in red: 6004600055 means PUSH 04 onto the stack, followed by PUSH 00 onto the stack (= [00, 04]) and then store it (SSTORE) on the blockchain as part of storage (key/value store).
The other one in dark berry : 7f48656c6c6f000000000000000000000000000000000000000000000000000000 means PUSH32 i.e., push next 32 bytes on the stack corresponding to “Hello”. The extra zeroes are padded to make it 32 bytes because each item on the stack is 256 bits (or 32 bytes) due to the Keccak-256 hash.
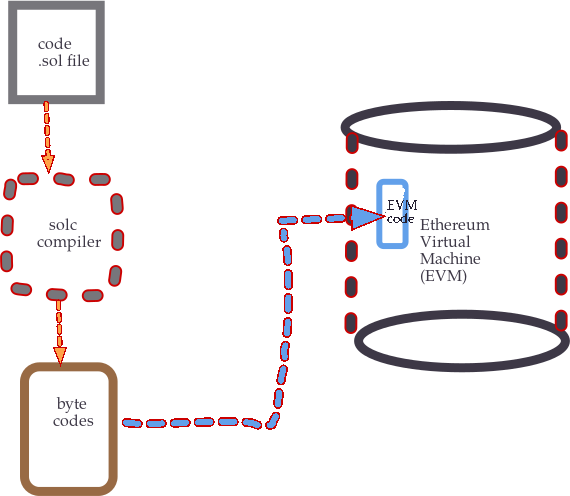
Most of the other bytecodes after the “Hello” string represent the contract aux data (cryptographic fingerprint of the source code used for verification) and are not very relevant to examine as it is never executed by the EVM. The below figure describes the whole process of compilation and EVM.
Contract Creation
In this section, we will see in brief how the byte codes get copied to the EVM .i.e. How a smart contract comes to life or gets created in EVM. A smart contract gets created due to a transaction. A transaction in a blockchain can be defined as digitally or cryptographically signed instruction from your Ethereum account (account is an entity that holds your Ether or ETH currency).
Once you sign in to your Ethereum account, you can create a transaction using JSON-RPC calls such as web3.eth_sendTransaction() or also directly using Remix IDE, Metamask, or any other deployment tool such as Brownie. Below is an example transaction for our smart contract hello.sol created above using Remix IDE as a deployment tool.
from             0x5B38Da6a701c568545dCfcB03FcB875f56beddC4
to               Hello (constructor)         // Will be "" before transaction mining
gas              80000000 gas
transaction cost 157157 gas
execution cost   157157 gas

input  0x6080604052600460005534801561001557600080fd5b5061017c806100256000396000f3fe608060405234801561001057600080fd5b506004361061002b5760003560e01c806319ff1d2114610030575b600080fd5b61003861004e565b6040516100459190610124565b60405180910390f35b60606040518060400160405280600581526020017f48656c6c6f000000000000000000000000000000000000000000000000000000815250905090565b600081519050919050565b600082825260208201905092915050565b60005b838110156100c55780820151818401526020810190506100aa565b838111156100d4576000848401525b50505050565b6000601f19601f8301169050919050565b60006100f68261008b565b6101008185610096565b93506101108185602086016100a7565b610119816100da565b840191505092915050565b6000602082019050818103600083015261013e81846100eb565b90509291505056fea26469706673582212209a5057c717a99b3e44da1fa5486ec9df39734103528de473257dd8b5b38715b164736f6c634300080a0033
As you can see above, “from” is the Etherum account, “to” is the default contract constructor, and “input” is the actual bytecode of the contract passed as an argument to the EVM. The EVM internally executes this input data as code after the deployer tool makes a transaction for deployment and hence a contract is created or born.
As it can be seen, the transaction used in creating a smart contract is the same as a regular transaction that can be one of
- Transferring Ether between accounts or contracts.
- Message call transaction to interact with the contract methods.
The only difference is, during smart contract creation the “to” part would be NULL(“”) initially and it gets filled with the contract default constructor address/contract address once deployed (i.e. after the transaction is mined). The contract address is similar to the addresses of the Ethereum accounts. The contract address is computed internally by the EVM from the address of its creator (sender) and how many transactions the creator has sent (nonce). The sender and nonce are RLP(Recursive Length Prefix) encoded and then hashed with Keccak-256. The EVM has an opcode CREATE to generate the smart contract address.
The CREATE opcode is used by default to deploy contracts. The resulting contract address is calculated by hashing as below:
- The deploying address or the sender address
- The number of contracts that have previously been deployed from that address — known as the
nonce
keccak256(rlp.encode(normalize_address(sender), nonce))[12:]
Thus after deploying the smart contract becomes alive and now you can interact with it using the JSON-RPC interface. In the next section, we will see how ABI helps to interact with smart contracts.
Application Binary Interface (ABI)
The Application Binary Interface or ABI as it is usually called is an interface to interact with the smart contracts. It is a JSON object describing contract functions, variables, modifiers, and other contract parameters. Think of the ABI as a user manual applied to smart contracts. There is a clear specification available on how to encode and decode the contract ABI.
The solidity compiler can be used to also generate the ABI similar to bytecodes as below.
$ solcjs hello.sol --abiThe above command generates a new file hello_sol_Hello.abi. Reading the contents in JSON format of the file.
[

    {
     "inputs":[],
     "name":"hello",
     "outputs":[
          {
             "internalType":"string",
             "name":"",
             "type":"string"
          }
       ],

       "stateMutability":"pure",
       "type":"function"
     }
]
As it can be seen that hello() is a public function with no inputs and returns a string as an output.
Contract Interaction
To interact with the contract defined above, there is an ABI encoding generated at runtime. This section explores ABI encoding when a call to hello() is made. First, it generates a function selector that comprises of the first 4 bytes of keccak256 hash of the string hello. Something like, first 4 bytes of keccak256(“hello()”) or “19ff1d210e06a53ee50e5bad25fa509a6b00ed395695f7d9b82b68155d9e1065”, namely 19ff1d21.
19ff1d21Similarly, if the function had an input parameter such as uint e.g.
function hello(uint x) pure public returns(string memory)It takes the first 4 bytes of keccak256(“hello(uint256)”) or “b0f0c96a477104212e7888d1c9bd833cf51ffa7a901726053c4b26f5651cdf58”, namely b0f0c96a as the function selector.
b0f0c96aThe parameter “x” can have any value (say in this case x =2), the value 2 is padded with 0 up to 32 bytes and concatenated with the function selector. The final ABI encoded input stream will be
b0f0c96a0000000000000000000000000000000000000000000000000000000000000002This input stream is sent to the contract address on the blockchain. The EVM is then able to decode the input and execute the smart contract code function.
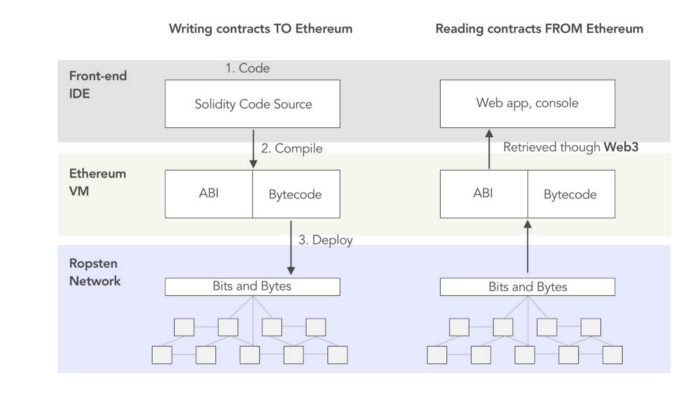
As a developer, it is not necessary to do the ABI encoding and decoding manually as there is a higher layer of abstraction such as web3.py or web.js that makes the job easier for contract deployment and interaction. The whole interaction of deploying the smart contract and interaction can be summarized as given in the below figure.
Winding Up
This article explained the Ethereum fundamentals such as EVM, bytecodes and ABI, smart contract creation, and finally interaction. As smart contract developers use web3 APIs to deploy and interact with the contracts, the internals is heavily abstracted. The internals comprises generating the bytes codes, ABI interfaces by the compiler, deployment by making a transaction, and then interaction using ABI encoding and decoding.