In this post, we will see the usage of web3.py in transactions, such as sending Ether from source to destination addresses. It will also include a brief introduction on web3. More specifically, we will look at techniques to send a transaction using the web3.py library with the necessary examples for the Ethereum blockchain.
Table of Contents
The need for Web3
It is also possible to interact with the smart contract without the web3 interface, as in the below figure.

Using direct Ethereum API to interact with a smart contract is more tedious and complex. The reason is the JSON-RPC interface on which Ethereum is based-on. This interface is not a very standard interface like REST-API. There is a need for some encoding scheme when using JSON_RPC, and it gets complicated. To overcome these problems, Web3 got introduced. Web3.js is for the Javascript interface, and Web3.py is for the Python interface. With Web3, the smart contract interaction would look as below.
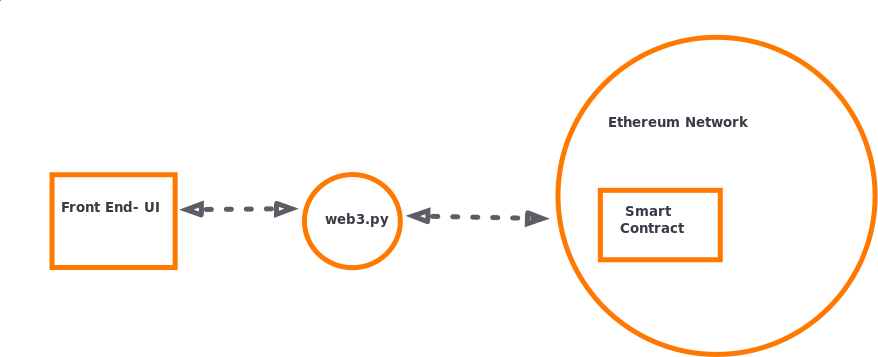
Web3.py abstracts all these complexities discussed above and provides users with straightforward APIs when interacting with smart contracts. The Ethereum network can be the local network or the main Ethereum network.
Installing Web3 and Other tools
To install web3.py, use the following command (mostly in virtual env)
$pip install web3
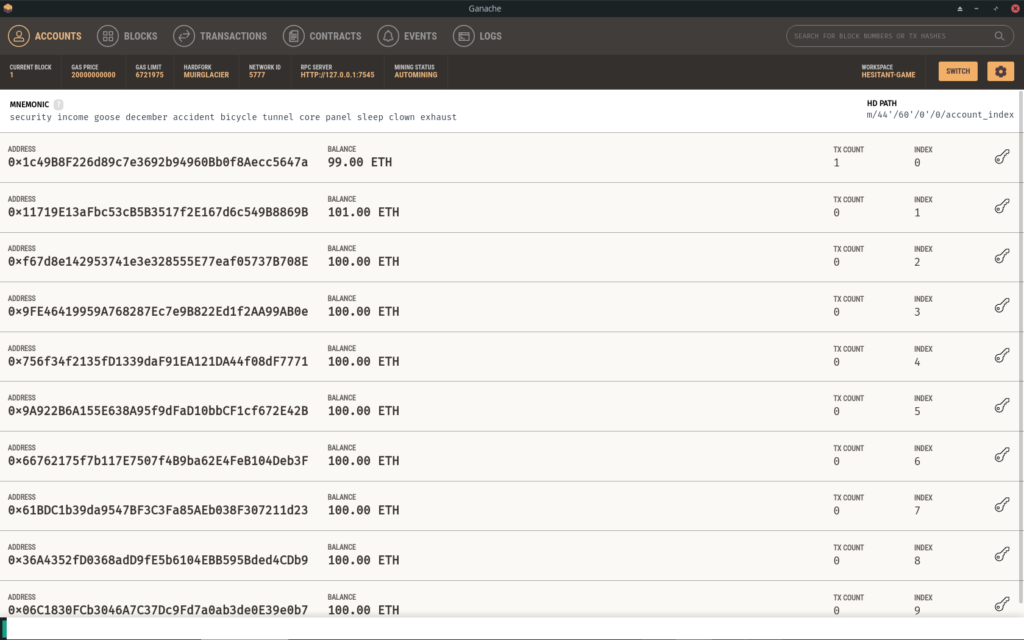
The other tool we need in this tutorial would be Ganache (to create a local blockchain). If you wish to work directly with the main Ethereum network (also called mainnet), then use Infura to connect to the mainnet. In this tutorial, we will use the local blockchain (Ganache). Download and open the Ganache app based on the OS environment you have. For this tutorial, I will use the latest version of the Ganache app on Linux (https://github.com/trufflesuite/ganache-ui/releases/tag/v2.6.0-beta.3). After you open the Ganache app, it takes a default workspace name (you can change it if you wish), and then click start, opens the window as below.

Jot down the RPC server address and any two wallet addresses (Ganache provides ten free wallet addresses), as we need them later. From the above figure, we can use these addresses.
RPC server address - HTTP://127.0.0.1:7545
Account 1 Address   = 0x1c49B8F226d89c7e3692b94960Bb0f8Aecc5647a
Account 2 Address = 0x11719E13aFbc53cB5B3517f2E167d6c549B8869B
Using Web3 for Connecting to Nodes
Web3.py allows three ways to connect to the nodes that include HTTP, IPC, and Websockets. Below example, using HTTP to connect to Ganache (local node).
from web3 import Web3

w3 = Web3(Web3.HTTPProvider('http://127.0.0.1:7545')) # connect to the above RPC server address

print(w3.isConnected())   # Must print True
eth.send_transaction() syntax
eth.send_transaction(transaction)where transaction is a dictionary with the following contents.
| Param name | Description |
| from: | An address the transaction is sent from in bytes/text |
| to: | An address the transaction is directed to in bytes/text |
| gas: | integer and optional. Gas provided for the transaction execution |
| maxFeePerGas: | integer and optional. The maximum amount you’re willing to pay |
| maxPriorityFeePerGas: | integer and optional. The part of the fee that goes to the miner |
| gasPrice: | integer. Integer of the gasPrice used for each paid gas (old method). Use maxFeePerGas and maxPriorityFeePerGas instead (new method for dynamic fee transaction). |
| value: | integer and optional. Integer of the value send with this transaction |
| data: | bytes or text. The compiled code of a contract |
| nonce: | integer and optional. It is how many confirmed transactions this account has sent previously |
eth.send_transaction() Example
Transfer of some crypto (Ether) from source account to destination account results in a transaction. Using the above parameters the transaction can be prepared and then use the call send_transaction(). To do the same, either open the terminal and type the following, or in a python file, and execute the python file from the command line.
>>> from web3 import Web3
>>> web3 = Web3(Web3.HTTPProvider('http://127.0.0.1:7545'))
True

# on your machine identify your src and dest account addresses(as noted above in the ganache app)
>>> src  = '0x1c49B8F226d89c7e3692b94960Bb0f8Aecc5647a'
>>> dest = '0x11719E13aFbc53cB5B3517f2E167d6c549B8869B'

# prepare the transaction (we will transfer 1 Ether from src to dest)
>>> transaction = {
...   'from':src,
...    'to': dest,
...   'value':  Web3.toWei(1, 'ether'), # 1 Ether (converted to wei)
...   'gas': 21000,    # Usually a standard value for Ganache
...   'maxFeePerGas': Web3.toWei(250, 'gwei'),
...   'maxPriorityFeePerGas': Web3.toWei(2, 'gwei'),
...   'nonce': web3.eth.get_transaction_count(src)
... }

>>> web3.eth.send_transaction(transaction)
# Tx hash (on your machine it will be something else)
HexBytes('0xc4d24244e9a021eb9bb6ed8849c159bf9bd0169a3a4aabaf18b1b69108bbda08')
After the transaction, you can verify if the Ether has been transferred from source to destination account by looking into the balance column. See below, the source has 99.00 ETH and the destination has 101.00 ETH.
eth.sendtransaction() not working
If for, some reason, the transaction fails, then it means the transaction was not successful, or the transaction is not working. It is possible to know if the transaction was a success or a failure at runtime using the below code. We shall use the above transaction hash value from the above transaction example.
Tx Hash = ' 0xc4d24244e9a021eb9bb6ed8849c159bf9bd0169a3a4aabaf18b1b69108bbda08'
>>> web3.eth.get_transaction('0xc4d24244e9a021eb9bb6ed8849c159bf9bd0169a3a4aabaf18b1b69108bbda08')

# Output below
AttributeDict({'hash': HexBytes('0xc4d24244e9a021eb9bb6ed8849c159bf9bd0169a3a4aabaf18b1b69108bbda08'), 'nonce': 0, 'blockHash': HexBytes('0xffc2d544d8cb709daa0b75ba20a9193c96d040dae45ff2ba5361f622e4032ee0'), 'blockNumber': 1, 'transactionIndex': 0, 'from': '0x1c49B8F226d89c7e3692b94960Bb0f8Aecc5647a', 'to': '0x11719E13aFbc53cB5B3517f2E167d6c549B8869B', 'value': 1000000000000000000, 'gas': 21000, 'gasPrice': 20000000000, 'input': '0x', 'v': 37, 'r': HexBytes('0x32da3d5e90685773884ac506d3fe1536d9e729fd1630a15f4c49930309239a02'), 's': HexBytes('0x08232d4c57ff9098e62713c9204f20cb72f61f90dc3de6da12f11e09f635e341')})
It means the above transaction was a success. In case the transaction is not successful or pending for some reason, it throws an exception web3.exceptions.TransactionNotFound. Below, for instance, where the transaction hash is invalid or unavailable on the local Ganache network utilized.
TxHash = '0x5c504ed432cb51138bcf09aa5e8a410dd4a1e204ef84bfed1be16dfba1b22060'
>>> web3.eth.get_transaction('0x5c504ed432cb51138bcf09aa5e8a410dd4a1e204ef84bfed1be16dfba1b22060')
Traceback (most recent call last):
  File "<stdin>", line 1, in <module>
  File ".local/lib/python3.9/site-packages/web3/eth.py", line 617, in get_transaction
    return self._get_transaction(transaction_hash)
  File ".local/lib/python3.9/site-packages/web3/module.py", line 57, in caller
    result = w3.manager.request_blocking(method_str,
  File ".local/lib/python3.9/site-packages/web3/manager.py", line 187, in request_blocking
    return self.formatted_response(response,
  File ".local/lib/python3.9/site-packages/web3/manager.py", line 172, in formatted_response
    apply_null_result_formatters(null_result_formatters, response, params)
  File ".local/lib/python3.9/site-packages/web3/manager.py", line 79, in apply_null_result_formatters
    formatted_resp = pipe(params, null_result_formatters)
  File "cytoolz/functoolz.pyx", line 667, in cytoolz.functoolz.pipe
  File "cytoolz/functoolz.pyx", line 642, in cytoolz.functoolz.c_pipe
  File ".local/lib/python3.9/site-packages/web3/_utils/method_formatters.py", line 649, in raise_transaction_not_found
    raise TransactionNotFound(message)
web3.exceptions.TransactionNotFound: Transaction with hash: '0x5c504ed432cb51138bcf09aa5e8a410dd4a1e204ef84bfed1be16dfba1b22060' not found.
Using get_transaction(tx_hash), we can check if the transaction was a success or a failure.
eth.sendtransaction() unknown account
It is possible to have unknown accounts used with eth.sendtransaction(). In such a scenario, you may get an invalid or unknown account error. To avoid such scenarios, it is always a best practice to validate the source and destination addresses before using the eth.sendtransaction() API, as below.
>>>Web3.isAddress('0x1c49B8F226d89c7e3692b94960Bb0f8Aecc5647a')  # use the source address as above
# Must be true
True
>>>Web3.isAddress('0xABCDEF12345678901234567898')  # Some random unknown address
# Must be False
False
eth.sendtransaction() gas price
Gas price strategy is only supported for legacy transactions. As per the latest EIP-1559 Transaction specifications, the gas price is replaced with two values described here.
- Max Priority Fee – is an optional fee that is set by the user and paid to miners directly.
- Max Fee Per Gas – is the absolute maximum fee per unit of gas you are willing to pay to have your transaction included in a block. This shall be referred to as the Max Fee for the sake of brevity and clarity.
Both these fees are dependent on Base Fee. The Base Fee gets calculated by the Ethereum network and not set by the end-users looking to transact or miners seeking to validate transactions. The Base fee is automatically increased or decreased depending on how full that new block is. With some calculations, the most frequently used values for Max Priority Fee and Max Fee Per Gas can be found to be approximately equal to Max Priority Fee = 2.0 GWEI, and Max Fee Per Gas = 202.0 GWEI.
eth.sendtransaction() vs eth.send_raw_transaction()
It is paramount to sign all the transactions else, are not included in the blockchain as they become invalid transactions.
The eth.sendtransaction() is used predominantly for sending Ether from one account to another, and it creates the signed transaction’s bytes for you automatically. Use it on a local node .ie. a node started and controlled by you. Such local nodes are as safe as you keep them. Local nodes also manage your private key. In our example above, as Ganache created a local node, we can use eth.sendtransaction().
The eth.send_raw_transaction() is useful when one has the raw bytes of a valid transaction. Use it on a hosted node, and such hosted nodes get controlled by someone else, e.g., When you connect to Infura, you get connected to a hosted node. The hosted nodes do not handle private keys but deal with signed transactions. Another use case of raw transactions is if you have some other advanced usage that requires more flexibility. The eth.send_raw_transaction() sends a signed and serialized transaction. See below.
# First sign the transaction using a private key

private_key = 'a1234567898643217645896'    # an e.g. private key in use, associated with the account

>>> signed_txn = w3.eth.account.sign_transaction(dict('from':src,
...    'to': dest,
...   'value':  Web3.toWei(1, 'ether'),    # 1 Ether (converted to wei)
...   'gas': 21000,                        # Usually a standard value for Ganache
...   'maxFeePerGas': Web3.toWei(250, 'gwei'),
...   'maxPriorityFeePerGas': Web3.toWei(2, 'gwei'),
...   'nonce': web3.eth.get_transaction_count(src)
... },
  private_key,                            # sign the transaction with the private key
)

# After signing the transaction use raw transaction to send
>>> w3.eth.send_raw_transaction(signed_txn.rawTransaction)
The private key is associated with every account and must be kept confidential.
Winding Up
In this post, we saw the usage of web3.py, a library for interacting with smart contracts, and supports multiple functionalities and use cases such as making transactions, getting block information, the balance of an account, conversion of denominations, transaction receipts, and much more. We covered examples of using the web3.py transactions on local nodes using Ganache. To get a further understanding of web3.py, you can use Infura (hosted node) to connect to the mainnet and make transactions or interact with existing smart contracts using its deployed address and its ABI. With web3.py, it is also possible to perform advanced operations such as deploying new smart contracts from solidity files. Thus using web3.py makes the developer’s life much easier and efficient when using smart contracts.